Showing posts with label Thank you card. Show all posts

10 January 2017

You're Tea-rific!

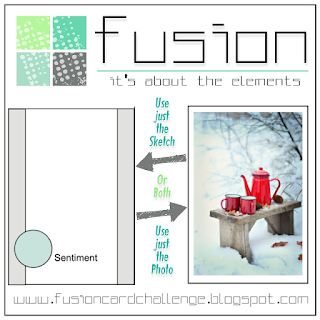
I'm entering this card in the Fusion Card Challenge.  It's my first time with this challenge blog and I love that there's two elements to the challenge.  You can choose to use just the sketch or just the inspiration photo to create a card, or you can fuse the two together!

Here's the inspiration photo:
 
http://fusioncardchallenge.blogspot.com.au/2017/01/fusion-3rd-anniversary.html
I chose to use both elements for my card.  Any excuse to stamp a pun!

Stamps:  Lawn Fawn-Best Pun Ever
Ink:  Stampin up
Dies:  Paper Rose circles and Paper Rose rectangles

Thanks for looking!

9 July 2014

A set of cards

Hi all,
Just here with a set of cards that I have made for a lovely lady who has been very helpful and thoughtful to me.  I can't take any credit for the card design, in fact I copied it completely from a card I saw on  pinterest here.  I thought I would bundle them up with coloured twine and send them to her in the mail. 
I love embossing on cards and I haven't done any for ages.  I found this little floral embossing folder (which I think came free with my cuttlebug) and I've never really liked it or used it, but I think it looks quite nice with these cards.  And yes, I forgot to emboss the sympathy card panel and was so annoyed with myself!  It would have looked much more finished with little embossed dots...never mind!


Thanks for looking!

Supplies: 
Cricut cartridge: Accent essentials (to die cut the flowers)
Embossing folders:  Swiss dots
Sentiment stamps: various Kaisercraft sets
Large brads:  Kaisercraft
Patterned papers:  Kaisercraft 'Hopscotch' collection

5 July 2014

Clean and simple flower card

Here is a card I have made for The Friday Mashup! card challenge.  The challenge this week was to use a watercolour wash and to keep your card 'clean and simple'. 


I rarely do clean and simple cards even though I love the look of them.  Must make them more often!  This would be an easy card to make multiple copies and give them away as a gift.

Supplies:
Flower die: MFT dies
Sentiment stamp:  Kaisercraft

15 November 2012

A little bit of inky fun

I've still been playing around with my distress inks - they are so much fun and very addictive!  I have had mixed results while mucking around with the inks - some turned out lovely and I was thrilled, others had colours sort of 'smoosh' together and turn a kind of 'murky, browny, blah' colour!  Ah well, you live and learn!

Here are some of the results of my inking fun:


I really love how this 'Friend' card turned out.  It is my favourite so far - love the colour combo and the marbled effect.  Once the ink dried I simply stamped the bird cage image (Kaisercraft) and the 'Friend' sentiment (Amy R) and it was done.

 This next card I like too, although I wish the colours were brighter and not quite so brown.  I love the splatters of colour all over the panel, just wishing that background was lighter and brighter.
And a little close up of those lovely, inky splatters!
 
 This little birthday card has me torn.  I love the yellow and I quite like the red splatters but I wish the green was a lighter shade, it just seems too dark next to the yellow and too dark for the stamp that I placed on top.  I also wish that I'd placed the sentiment just a little further to the right of the card.
 

And this last card, well, I almost didn't post it because it is pretty awful!  And no, I'm not after sympathy comments and I'm not looking for sympathy praise...it's just one of those cards that turned out NOTHING like I had pictured in my head!  And here it is, hold your breath...if it were a plant it would be called something like 'Cardeous Horribilious' or 'Cardeous Totally Muckedupeous'...you get the picture!!

My grand vision was this:  I masked off an area for a sentiment, then I wanted to marble the lovely colours of yellow, orange, green and purple.  However, I think I smooshed the purple way too much with the other colours, causing a bit of a murky, horrible browny colour.  But the worst part of it all?  Well the worst part was that I had said to my husband, "Hey, come and watch this, this is so awesome.  I'm going to make this really cool effect on my card, it's going to look so good".  Yes, I talked it up and then I did my excellent demonstration in front of my attentive hubby, who really didn't know what to say once I lifted up the card and had these feral looking colours all over it!!  He simply said, "I think you might have mixed the colours a bit too much!" 

Anyway, I let it all dry, pulled off the mask, sat the card down (face down unfortunately) and got a few little splotches on the white masked area.  So annoyed!  So of course I tried to fix it by adding some yellow splotches to make it look deliberate...you know sometimes when you just keep trying to fix something and you just need to tell yourself to stop, there is nothing more I can do to fix this!!  Well, this was one of those times!

So, what have I learnt from all of this? 
1.  Don't brag about your work until it's finished and you actually know it looks OK!
2.  It's much easier to use the distress inks onto a panel than directly onto the card itself.  You can attach the panel if it looks good, but you can't fix the card itself if you muck it up.
3.  Use the darker colours a bit more sparingly than I have been.
4.  Practice makes perfect!

Thanks for looking!
17 October 2012

Butterfly thank you card


I made this card in about 5 minutes - got to love that!  I love yellow, it's such a happy, cheerful colour.  I wanted to stamp the sentiment in yellow also, but I was worried that it wouldn't stand out enough.  I copied the idea from this blog, Ink it up.  Their card was a one-layer card and so lovely, but I thought that my card needed a solid colour as the base.  I also made one in red, another in purple, and one more in green.  Took no time at all!

Here is my green version of the card - I made it slightly differently and had a go at stamping on a dictionary page.  I found and purchased a second-hand dictionary for $1 at a local Vinnie's store.  I thought the words would make a nice backdrop for the butterfly stamps.  I thought I was very clever and used the page that had the definition for 'thank' on it.  The word 'thank' was nicely placed down the bottom to the left of my stamped 'thanks so much' sentiment.  Ah yes, just perfect.  I thought I was very clever until I was about to take the photo and realised that the first word at the top of the card was 'tes'tis' and in the definition were words such as 'sperm' and 'scrotum'...hmmm, not so clever after all!  Oh well, let's just hope the recipient of the card does not look too closely at it!

Thanks for looking!

1 September 2012

Set of hexagon cards

This is a little set of cards that I have made for my Mum for her 60th birthday.  I have already made her birthday gift (a digital scrapbook album of her life from birth to 60 years - 91 pages in total!!) but she will be receiving that gift at her party which is a week before her actual birthday.  So I thought it would be nice to have something little to give her on her actual birthday so that she doesn't go empty-handed on the real day!

So Mum, if you're reading this, stop reading now please!


 First I made this cute little gift bag for the cards.  I cut the bag on my cricut machine using the Plantin Schoolbook cartridge.  I set it to 'fit to page' and it cut and was so easy to put together...I think it took about 1 minute!

I then measured what size my cards needed to be to fit into the bag (which was 3.5 x 5 inches).  I wished I had a 12x24 inch cricut mat so that I could make this bag a bit bigger...however, the smaller cards are still a nice size.

I cut out a HEAP of hexagons on my cricut machine using the Accent Essential cartridge and then just pieced the cards together.  I popped up the centres of the flowers with a pop dot just to give it a little bit of dimension.  I got the idea for the cards on Pinterest where I saw a very cute hexagon flower card.  Here is the link to the site if you would like to look.  I did a 'hexagon cards' search on pinterest and was blown away by how much inspiration there was!  So many clever people out there!


I tried to make the cards bright and cheerful and to fit a range of purposes.  Mostly I use birthday cards, so I gave half of the cards a birthday sentiment.  I think a set of handmade cards is a nice gift, and once you have an idea, it actually doesn't take too long to make them.

Now, what to do with the other 100 random hexagons that are strewn across the kitchen table????

Thanks for looking!

23 August 2012

Owl fever!

So it's no secret that I love the cute little owl on Create a critter.  And since I needed to make a couple of birthday cards for girlfriends, I thought I'd cut out a few owls at once.  I love cutting them out with patterned paper - they are just so cute!  So here are a few more of my owl cards...


This third owl card was inspired by something I saw on pinterest.  I was trying to make the owl look like he was sitting in the hole of his tree...maybe I should have added a little branch for him.  I love making a few copies of the same card and just changing the papers a bit - it's good to add to your stash of cards and it's easier if you can do it in bulk.

Thanks for looking!